CSP Sunshine Village
Volunteer Patrol Manual
Canadian Ski Patrol · Calgary Zone · Sunshine Village, Banff AB
For trained & signed-off CSP members. Memory-jog reference — not a replacement for training.
Season 2025–26 · v1.0
Overview & Scope
CSP volunteers at Sunshine Village (SSV) integrate fully with the professional patrol on weekends and holidays. We perform substantially the same duties as paid patrollers, with a small set of exclusions. We hold the same professional standards.
⛔ CSP Scope Exclusions
CSP patrollers do not participate in: snowmobile operation · active avalanche control (explosives or ski-cutting) · chairlift self-evacuation · gondola evacuation/self-evacuation · high-angle rope rescue. CSP may assist as ground crew in gondola evacuations or avalanche SAR when requested.
The Mountain at a Glance
| Zone | Lifts (CSP scope) | Key Patrol Locations |
|---|
| Lowers (Village) | Wawa Quad, Standish Express, Strawberry Express, Gondola | PHQ (Patrol HQ) |
| Base (Bourgeau) | Gondola base station | BG Infirmary |
| Uppers (Village) | Angel Express, Great Divide Express, Teepee Town Luxury Express, Jackrabbit Quad | Beaver Lodge (Divide) |
| Goat's Eye | Goat's Eye Express, Wolverine, Sunshine Coast | Goat's Eye Infirmary, Donkey Den |
ℹ Zone Assignment
You are assigned to either Village (Lowers + Uppers) or Goat's Eye for the day. Check your assignment at morning briefing.
Out-of-Scope Terrain
CSP does not patrol Delirium Dive or Wild West freeride zones. We also do not conduct checks or sweeps for the 16 checks/sweeps reserved for pro patrol only. When in doubt, ask your Pod Leader (PL).
Starting Your Day
ℹ Report Time
Arrive at PHQ by 0800. If running late, call Dispatch: 403-762-6515 (emergency) or text/email the PL.
Morning Briefing Checklist
- Sign in at PHQ and collect your radio — set to Ch 1 (Ops Repeater)
- Collect punch card for your assigned checks
- Confirm zone assignment (Village or Goat's Eye) with Hill Leader (HL)
- Note any terrain closures, snow safety bulletins, or racing closures for the day
- Confirm your Pod Leader and backing location for Code 6 response
- Ensure pack has: 6-17 (toboggan), 6-19 (backboard), 6-21 (trauma pack)
Equipment You Carry
| Item | Notes |
|---|
| Radio (Ch 1) | On at all times. Ch 3 is backup if Ch 1 down. |
| CSP patrol pack (first aid) | Provided by SSV. Check contents at start of day. |
| Patrol jacket + name tag | CSP name tag must be visible. |
| Helmet | Required. |
| Avalanche transceiver, probe, shovel | Required for all on-hill days. |
| Black ski pants | Patroller responsibility. |
Morning Checks — General Principles
- Beginner runs first: Easiest runs have highest hazard potential for novice guests — prioritize signs and markings here.
- Grooming ridges: Common around run signs. Stomp ridges flat as reasonably possible.
- Banners drift downhill: Reset Slow/Caution/Merge/Look banners to correct positions daily.
- Code 6 takes priority over morning checks. Arrange with PL to have another patroller finish your checks, or return after the C6 is clear.
- Radio Dispatch when complete (unless on Goat's Eye — PL radios once all GE checks done).
Standard Lifty Shack Checks
| Item | Check |
|---|
| 6-17 (Toboggan) | Present, accessible, in good condition |
| 6-19 (Backboard) | Present |
| 6-21 (Trauma Pack) | Present (where specified) |
| AED | Present, charged (where specified) |
| Vacmat | Present (where specified) |
| Traction splint | Present (Divide, Sunshine Coast, GE lifty shacks) |
Morning Checks — Lowers Village
Wawa Morning Ski Checks
- Check caution sign above bottom chute is in place
- Check 6-17s, 6-19s, 6-21, AED, vacmat in lifty shack
- Meadowpark and north boundary line checked by Run 16
- Black signs at top of Star Trek and Birdcage
- 'Caution' signs at start of Paris Ridge (paid patrol ski-cuts Paris Ridge if needed — CSP does not ski-cut)
- Warning sign at boundary fence gate to backcountry
- 'Look' banner at cutoff to bottom of Birdcage
- 'Slow' banners at bottom of Old T-bar and Tilton Trail
- Rope fences in place around reservoirs
- If Tincan closed for racing: rope-lines at top and halfway point must be in place
- If not in place, remind coaches
- Radio Dispatch: "Tincan closed for racing" / "Tincan open to public" (afternoon)
✓ CompleteRadio Dispatch: "Wawa Ski Checks complete"
Standish Morning Checks
Described for solo patroller — divide if you have help.
- 'Slow' banners on each side of lift closure area
- Put out chicane fence if busy day requested
- Check 6-17s, 6-19s, vacmat, AED, 6-21 in lifty shack — take punch
- Ski Borderline · Check green run signs
- Check Borderline cornice — cut if safe to do so
- Orange fence at closure along Prune Pickers
- 'Caution' sign above cliff (between Prune Pickers & Showboat)
- Black sign at top of Showboat + 'Caution' sign on bump
- Ski Creek Run · Check green run signs
- Ski over to Bunkers · Check 'Caution' signs and rope/boo lines
- Ski Little Bunkers · Check blue run signs · Mark winch bucket
- Ski to Big Bunkers · 'Caution' signs on MFC
- Black signs at each entrance to Donkey Tail and Virgin Chutes
- Check black signs at top of run
- Black and 'Caution' signs on right side above Headwall, Garbage Chutes
- Put out 'Merge' banner near bottom of run
- Ski below Prune Pickers to top of Waterfall
- Check black run sign at top
- 'Slow' banner at bottom of Waterfall
- Ski Laryx (paid patrol checks if ski cuts needed)
- Check boundary rope-fence
✓ CompleteRadio Dispatch: "Standish run checks complete"
Strawberry Morning Checks
- 'Slow' banners on either side of tree island (punch hanging in tree island)
- Visually check 'Caution' sign above Boutry's Bowl rock
- At top: check 6-17s, 6-19s
- De-rime rope at unload area if necessary
- Ski Rock Isle Road · Check green run signs · Rope lines on Boutry's Bump
- Ski Dell Valley
- Check 3 'Caution' signs on left, below Standish Headwall
- Check green run sign at top
- Orange fence around water pump · Fix Mitey Mite orange fence if needed
✓ CompleteRadio Dispatch: "Strawberry run checks complete"
Morning Checks — Uppers Village
Assiniboine Morning Checks
- Check 6-17s, 6-19s at top of Angel
- Green run signs and orange fence along Green Bench
- Blue/black signs above Pistes (if open)
- Signs at Cat-track Corner
- Green run signs on Green Run through Springhill
- 'Caution' banner below Springhill terrain park
- Orange fence at Picadilly · 'Merge' banner at Picadilly
- Ski over Pandemonium · Orange fence on Pando · 'Merge' banner at bottom of Pando
- Ski to Cat-track Corner · Ski out to boundary
- Ski along boundary to Peyto Pass — de-rime/adjust rope-line as needed
- Complete any leftover sign/banner adjustments
✓ CompleteRadio Dispatch: "Assiniboine checks complete"
Angel Morning Checks
- Ski Blue Run · Check blue run signs · Check rope-line on left for closures
- 'Slow' banner from winch bucket
- Ski Angel Traverse · Orange fence, closures of Little Angel, OS Pitch
- Black signs for Little Angel, OS Pitch when open
- From bottom of Angel Traverse, ski White Way
- Yellow 'Slow' banners near bottom of White Way
- Ski Angel Gully to bottom
- Black run signs at top of Boundary Bowl
- Ski across Boundary Bowl to Viking Ridge
- Cross Viking Ridge, South 205, Angel Flight — check ropelines and closures
- Ski to Brewster's Pockets · Check closures, ropelines, 'Caution' signs
- Ski to Cherub, check 'Caution' signs
- Ski World Cup Downhill to bottom
✓ CompleteRadio Dispatch: "Angel checks complete"
TP/Shoulder Morning Checks
⛔ STOP — Explosive Control
Do NOT ski the Shoulder if it is closed for explosive control. Confirm Shoulder status with PL before proceeding.
- Ski Black Run · Black run sign at top · Ropeline for Wilson's Way closure
- Yellow 'Slow' banner from tower at bottom (where Black Run meets Angel Traverse)
- Ski Ecstasy · 'TP Chair Closed' sign at perm sign at top of Ecstasy
- 2 'Slow' banners at bottom of Ecstasy steep pitch (one each side of tree island)
- 'TP Chair Closed' sign at perm sign at bottom of Ecstasy
- Orange 'Look' banner at bottom of Big Angel
- 'TP Chair Closed' signs at top of Barners, Pilgrims, Packers
- Ski to Teepee Chair · In clearing: orange fence, 'Slow' and 'Merge' banners
- From chair: visually inspect north boundary ropeline top-to-bottom; de-rime if needed
- From chair: look for 'Caution' signs on top of Teepee Main and Rock Ledges
- Ski black run to Teepee Main Chutes
- Black run signs at top of Teepee Main and Liftline
- Ski across to Shoulder traverse · Check Shoulder entrance sign/ropeline (Open/Closed)
- Check Horto's Trees ropeline · 'Caution' sign on Shoulder · Traverse the Prow
- Check/de-rime boundary ropeline and 'Closed' signs
- Walk boundary ropeline from Teepee Chair down to de-rime and adjust
✓ CompleteRadio Dispatch: "TP/Shoulder checks complete"
Divide Morning Checks
- Check 6-17s, 6-19s at BL
- Check AED, 6-21, vacmat and traction splint in lifty shack
- Confirm Dive sign is closed · Black signs at top of Bye Bye Bowl
- Ski South Divide · Blue run signs + Bye Bye Bowl black signs on left
- Ski across Green Bench to Piste Noir · 'Caution' banner at bottom
- Blue run signs on Highway One · 'Divide Chair Closed' signs present and stashed
- Ski North Divide
- Check north boundary ropeline: Dive gate → top of Teepee Chair (de-rime; may need to walk early season)
- Ski Boundary Bowl · 'Caution' banner at bottom
- Ski Bye Bye Bowl · Check south boundary ropeline (de-rime if needed)
- Ski to Cat-track Cutoff · De-rime ropeline (below Cat-track Cutoff = Assiniboine responsibility)
✓ CompleteRadio Dispatch: "Divide checks complete"
Morning Checks — Goat's Eye GE
⚠ Goat's Eye Protocol — Different from Village
PL assigns multiple checks per patroller depending on coverage. Do not radio Dispatch after each individual check — the PL radios once when ALL GE checks and sweeps are complete. Always check with PL what other checks you can assist with after your own.
Jackrabbit/Wolverine Morning Checks
- Check/de-rime blue double ropeline at base of Wolverine Chair
- Ride Wolverine Chair
- Check 6-17 and 6-21 in lifty shack (early season before GE opens: two 6-17s and 6-19s)
- Check/de-rime ropelines under top of chair
- Ski Banff Ave to Wolverine · Bang snow off tower pads if needed
- 'Slow' banner on Wolverine · Ski right across Trifecta: 'Slow' banners on Wolverine Liftline and Goat Chicken
- Ski lower Wolverine · Check ropelines around trees and tower pads
- Correct deficiencies from Lap 1
- Ski Blackbell/Bluebell if groomed — check for grooming issues ('Merge' banners at bottom = Run 16 responsibility)
- Check with PL for additional checks
Sunshine Coast Morning Checks
- Check 6-17s, 6-19s · AED, 6-21, vacmat, traction splint in lifty shack
- Ski Sunshine Coast · Check/de-rime ropelines + blue run signs
- Snow fences and closures on right (responsible for boundary ropeline to Wild West gate only)
- At first bend: 'Slow' banner from left side
- Ski Gold Bench: black + double-black run signs on top of Hell's Kitchen and Freefall
- Check/adjust orange deflector fence above Freefall · Check Run 17 above Wildfire
- At next bend: snowmobile warning sign on left
- Ski Bronze Bench · 'Merge' banner at bottom of Wildfire (if no Wildfire check being done)
- Orange deflector fence on Bronze Bench
- Visually check 'Caution' banners at bottom of Big Woody
- De-rime ropeline on side not done in Lap 1 · Fix leftover signage
- Check with PL for additional checks
Hell's Kitchen Morning Checks
- Ski to Wild West gate (assist Sunshine Coast checks en route if time allows)
- From Wild West gate: ski right boundary ropeline, de-rime as needed
- At top of Hell's Kitchen: check for two double-black run signs
- Continue along boundary ropeline · Check rope-gate from Wild West (open/closed per PL)
- 'Caution' sign at top of the choke · Ropeline above cliffs
- Ski traverse past Supermodel to bottom of Freefall
- Ski to base of GE · Check with PL
Freefall Morning Checks
- Visually check from chair · Ski Raptor if open — ropelines on either side, de-rime
- Ski to top of Freefall: four double-black signs + one black sign
- Check deflector fence (Sunshine Coast responsibility — assist if needed)
- Ski Freefall to ropeline · Double-black and 'Caution' signs
- Ski to base of GE · Check with PL
Glade/After Morning Checks
- Ski Eagle if open — ropelines each side, de-rime · Ski to Skydive — 'Slow' banner at bottom
- Ski to top of Gladerunner: two 'Caution' signs at top of roll
- Green 'Merge' banner at top of roll above Freefall traverse (put out from trees on right if pulled for grooming)
- Ski left to Afterburner: 'Merge' banner at bottom of Silver Afterburner
- 'Merge' banner at bottom of Silver Gladerunner · Bronze Afterburner bottom · Bronze Gladerunner bottom
- Ski to base of GE · Check with PL
Scape/Rolling Morning Checks
- Ropelines around No Man's Land, de-rime · Ski Bucky's — 'Slow' banner at bottom
- Ski to Rolling Thunder → Big Woody (as far as cliff)
- Three 'Cliff' signs above cliff halfway down · Ski left to Rolling Thunder
- Green 'Merge' banners at bottom · Visually check 'Caution' banners at bottom of Big Woody
- Ski to base of GE · Check with PL
Southside Chutes Morning Checks
- Put out double-black and 'Caution' signs + chalkboard
- Open walking track rope gate
- Radio Dispatch: "SS Chutes walking track open to public"
- Ski along road checking ropelines and closures
- Ski across top of chutes → You Too connector → Me Too
- Boundary ropeline OK (closure signs every 4th post)
- Ski along boundary to Tobacco Road · Snuffy's gate closed
- 'No uphill travel' signs at bottom of chutes + start of Tobacco Road
- Ski Tobacco Road to the Ashtray · 'No uphill travel' signs at bottom of chutes to Tobacco Road
- Ski Eagle Creek: orange deflector fence + 'Cliff' signs at top of cliff · 'Caution' sign on bump below cliff
- Ski to base of GE · Check with PL
Old Chute/Wildfire Morning Checks
- Check 6-17s, 6-19s, AED, 6-21, vacmat, traction splint if Sunshine Coast hasn't done so
- Ski Sunshine Coast to Old Chute · Check ropelines each side
- At bottom of Old Chute: 'Slow' banner + orange deflector fence from trees on right
- Ski Gold Bench to Wildfire
⚠ Wildfire Racing
If Wildfire closed for racing: confirm race closure ropeline is up (remind coaches if not). Slide race course to 'Closed'. Radio Dispatch. In afternoon when racing ends: radio Dispatch "Wildfire open to public" and slide to 'Open'.
- Ski Wildfire · 'Merge' banner at bottom from trees on right
- Ski to base of GE · Check with PL
Afternoon Sweeps — General Principles
- Make your best effort — it's impossible to visually cover every square metre. Call and listen into trees.
- Adjacent sweeps complement each other — they are designed to cover terrain you can't see from your own sweep. Waves confirm coordination.
- Slow skiers must be off the hill before a sweep can be called clear. It is acceptable to ask slow skiers to take the easiest run down.
- Season changes: At opening/closing, some sweeps may be modified — ask your PL if in doubt.
- Sweeps use a 3-way wave system to coordinate between adjacent sweep teams at designated locations.
ℹ Wave Protocol
When this guide says WAVE, make visual contact with your sweep partner at the specified location before proceeding. A 3-way wave requires all three parties to confirm before the area is called clear.
Lowers Sweeps Village
Wawa Ski Sweep
- Last chair on Wawa
- Ski to top of Paris Ridge
- Wait for Standish sweeps at their positions (Lifty sweep at big rock, Borderline sweep at Prune Pickers perm sign)
- Visually clear treed area and bowl below Prune Pickers perm sign
- 3-WAY WAVE to Standish Lifty and Borderline sweeps
- Ski left across top of Star Trek and Birdcage — look and call down
- Ski left across Wawa Bowl into Tincan trees — look up and down (Run 16 sweep clears Tincan, don't go past trees)
- Ski right across Wawa Bowl to Star Trek trees — clear
- Ski left across top of Old T-bar — look down
- Ski left to Wawa Bowl above chute — clear up and down
- Ski to bottom
✓ CompleteRadio Dispatch: "Wawa ski sweep clear"
Standish Lifty Sweep
- Last chair on Standish · Call out beyond boundary
- Ski right to top of Jerry's Run — look down · Ski left to above tower 9
- Continue left to Creek Run — looking up and down
- Ski right to Big Bunkers · Ski right across top of MFC · Look down Standish Face
- Ski to Virgin's — look down · Ski left to top of Donkey Tail — look down each chute
- Ski down to big rock
- Visually clear Paris Basin and Star Trek trees as much as possible
- 3-WAY WAVE to Borderline sweep at Prune Pickers perm sign and Wawa ski sweep at top of Paris Ridge
- Traverse right across Virgin (staying high) to Jerry's Run
- Pull 'Merge' banner — place on skier's right edge of run · Ski to bottom
✓ CompleteWhen both Standish sweeps together: "Standish sweeps clear"
Standish Borderline Sweep
- Last chair on Standish · Ski Borderline
- Look down Creek Run as far as possible · Look, call out to boundary line
- Traverse Borderline right up onto ridge beside Creek Run · Ski back into Borderline
- Ski to Prune Pickers corner · Visually clear Paris Basin
- 3-WAY WAVE to Lifty sweep at big rock and Wawa ski sweep on top of Paris Ridge
- Ski below Prune Pickers to Waterfall
- Ski Waterfall to cutoff on right (if grooming designated for Waterfall that evening: pull 'Slow' banner at bottom)
- Ski behind hotel to base of Standish · Visually clear up Showboat
✓ CompleteWhen both Standish sweeps together: "Standish sweeps clear"
Uppers Sweeps Village
Assiniboine Sweep
- Last chair on Divide
- Ski diagonal traverses across Bye Bye Bowl — visually sweeping boundary to South Divide
- Visually clear bottom of bowl · Ski through bowl to Cat-track Cutoff
- WAVE to Divide/Angel sweep at Cat-track Corner
- Ski Green Run to Peyto Pass perm sign
- WAVE to Divide/Angel sweep at bump above ODD (part of 3-way wave to Rock Ledges sweep at bottom of Angel Traverse)
- Ski across Green Run — visually clearing down Highway One
- Ski Springhill to 'Caution' banner · Pull banner, place in trees on right
- Ski to clearing at end of Springhill
- WAVE up through trees on right to Divide/Angel sweep at bottom of White Way
- Ski over Pandemonium · Ski to bottom
✓ CompleteRadio Dispatch: "Assiniboine sweep clear"
Divide/Angel Sweep
- Last chair on Divide · Ski diagonal traverses across South Divide
- Stop at last Divide tower above Green Bench
- 3-WAY WAVE to TP/Shoulder sweep at top of Teepee Chair and Rock Ledges sweep at top of Angel Chair
- Ski Green Bench to Cat-track Corner — looking down Pistes and Boundary Bowl
- WAVE to Assiniboine sweep at Cat-track Cutoff
- Turn hard right · Ski across Piste Blue and Noir · Visually clear Boundary Bowl, Viking Ridge, South 205, Angel Flight
- Ski to bump above ODD
- 3-WAY WAVE to Assiniboine sweep at Peyto Pass perm sign and Rock Ledges sweep at end of Angel Traverse
- Radio Dispatch: "Divide sweep clear"
- Ski to White Way · Ski diagonal traverses across White Way — clearing trees each side
- Ski to 'Slow' banner — place in trees
- 3-WAY WAVE to Assiniboine sweep down left through trees at end of Picadilly Circus and Rock Ledges sweep on top of Rock Ledges
- Ski through Angel Gully to bottom
✓ CompleteRadio Dispatch: "Angel sweep clear"
Rock Ledges Sweep
ℹ Silent Sweep
Rock Ledges Sweep does NOT radio Dispatch on completion — ski to Jackrabbit Chair for last chair.
- Last chair on Angel · Wait for TP/Shoulder and Divide/Angel sweeps at wave positions
- 3-WAY WAVE to TP/Shoulder at top of Teepee Chair and Divide/Angel at last Divide tower above Green Bench
- Ski diagonal traverses across Blue Run
- Above Angel Traverse: pull 'Slow' banner, place beside winch bucket on right
- WAVE to TP/Shoulder sweep by tower at bottom of Black Run
- Ski Angel Traverse to end of orange fence
- WAVE to Divide/Angel at bump above ODD (part of 3-way wave to Assiniboine at Peyto Pass)
- Visually clear Brewster's Pockets · Turn hard right across slopes below Angel Traverse
- Stay high across OS Pitch and Big Angel to bottom of steep pitch of Ecstasy
- Pull left 'Slow' banner on Ecstasy, place in tree island
- WAVE to TP/Shoulder sweep at top of Ecstasy · Step through tree island
- Pull right 'Slow' banner · Ski down and right through trees to top of Teepee Main Chutes
- Visually clear up/down Chutes and Teepee Trees
- Ski left through trees to top of Rock Ledges
- WAVE to Divide/Angel sweep at bottom of White Way
- Ski down and left below Angel Liftline · Ski across top of Barners and Packers — clear down
- Ski down Packers — clear up Pilgrims · Ski to clearing at Teepee Chair
- WAVE up to TP/Shoulder sweep on Shoulder traverse
- Ski to Jackrabbit Chair for last chair
TP/Shoulder Sweep
- Last chair on Divide · Ski diagonal traverses across North Divide (north boundary to South Divide)
- Ski to top of Teepee Chair
- 3-WAY WAVE to Divide/Angel at last tower above Green Bench and Rock Ledges at top of Angel Chair
- Ski Black Run to 'Slow' banner — pull banner, place by tower
- WAVE to Rock Ledges sweep at bottom of Blue Run
- Ski to top of Ecstasy
- WAVE to Rock Ledges sweep at bottom of Ecstasy
- Ski across top of Little Angel, Teepee Main Chutes and Teepee Liftline — looking up and down
- Ski to Shoulder Traverse
- WAVE to Rock Ledges sweep in clearing at Teepee Chair
- Visually clear Horto's trees · Ski the Shoulder, clearing each side of prow (to boundary)
- Ski to Teepee Chair clearing
✓ CompleteRadio Dispatch: "TP/Shoulder sweep clear" · Ski to Jackrabbit Chair for last chair
Goat's Eye Sweeps GE
⚠ Reminder
Do not radio Dispatch after each individual GE sweep — PL calls once when all are complete.
Sunshine Coast Sweep
- Last chair on Goat's Eye · Ski Sunshine Coast to first bend
- Pull 'Slow' banner, place by left ropeline · Ski Gold Bench
- WAVE to Hell's Kitchen sweep at top of Hell's Kitchen
- WAVE to Freefall sweep at top of Freefall
- WAVE to Glade/After sweep at top of Gladerunner
- Ski to Rolling Thunder perm sign
- WAVE to Scape/Rolling sweep at Cleavage (part of 3-way wave to SS Chutes sweep in Ashtray — not visible)
- WAVE to Old Chute/Wildfire sweep at top of Wildfire
- Ski, sweep rest of Sunshine Coast to base of GE
Hell's Kitchen Sweep
- Last chair on GE · Ski to Hell's Kitchen — wait for wave from Sunshine Coast sweep
- WAVE to Sunshine Coast sweep · Visually clear open area at top
- Ski trees on left — zigzagging, calling. As trees tighten: ski diagonal down-right to above the choke
- Watch right boundary line for signs of recent poachers (if found: inform Snow Safety)
- Ski through choke to cliff ropeline closure · Call up through the trees
- Ski traverse to Supermodel · Visually sweep up and down Supermodel
- Ski to Freefall · Ski/sweep bottom of Freefall to bottom of Silver Bench
- WAVE to Freefall sweep at Gladerunner perm sign · Ski to base of GE
Freefall Sweep
- Last chair on GE · Ski Raptor to Figjam Trees — sweep trees
- Ski to top of Freefall (left end of deflector fence) — wait for wave from Sunshine Coast sweep
- WAVE to Sunshine Coast sweep · Sweep trees on left
- Ski right to top of Supermodel — call down
- Turn left below next tower, ski back to Freefall — call down past ropeline
- Ski left along ropeline to Gladerunner
- At end of ropeline: WAVE up to Glade/After sweep at green banner
- Ski right, staying high to below edge of Catcher's Mitt — call out to cliffs
- Kick-turn left, ski back to Gladerunner · Ski Gladerunner to Silver Bench, turn left
- 3-WAY WAVE to Scape/Rolling and Glade/After sweeps at perm signs
- WAVE to Hell's Kitchen sweep · Ski down Gladerunner to base of GE
Glade/After Sweep
- Last chair on GE · Ski Eagle (if open) to Barney's Trees — call into trees
- Ski to top of Gladerunner
- WAVE to Sunshine Coast sweep · Ski Gladerunner, calling into trees on left
- Ski right to Goat Glades — call into trees · Ski down to green banner
- WAVE down to Freefall sweep at end of ropeline
- Ski left to Afterburner · Visually clear down right side · Ski down left side to perm sign on Silver Bench
- 3-WAY WAVE to Scape/Rolling sweep at perm sign below Rolling Thunder and Freefall sweep below Silver Gladerunner
- Ski down Sasquatch to base of GE
Scape/Rolling Sweep
- Last chair on GE · Ski between Pam's and Bucky's to bottom of trail crew fence (if closed/difficult: ski around to bottom of Cleavage)
- Ski toward telecom tower · Ski down left, curve right to below middle of Cleavage
- 3-WAY WAVE to Sunshine Coast at Rolling Thunder perm sign and SS Chutes in Ashtray (position yourself against snow, not in front of rock for visibility)
- Ski Pam's — diagonal traverses to trees on each side
- Ski diagonally across Rolling Thunder and Scapegoat and back to Rolling Thunder
- Ski Rolling Thunder to roll above tree island — look and call down
- Ski through Chicken to Scapegoat · Ski in/out of Big Woody to bottom of Gold Scapegoat
- WAVE to Glade/After at perm sign on Silver Bench (part of 3-way wave with Freefall at Silver Gladerunner)
- Take Sergei's Shortcut left, back to Rolling Thunder · Ski/sweep Rolling Thunder to base of GE
Southside Chutes Sweep
⚠ Close SS Chutes at 3:30
Move chalkboard to side, flip sign to 'Closed', tie double ropeline. Check with PL if unsure.
- Ski along road to R2 · Ski down below rock shoulder on left · Side-step up above cornice
- Drop down into Spazzy's · Traverse left across D2, YouToo, MeToo — looking/calling up and down each chute
- Ski far enough left to visually clear to boundary ropeline · Traverse right to R1 · Clear trees below
- Diagonally traverse back left to MeToo · Ski to Tobacco Road · Ensure Snuffy's gate closed
- Ski Tobacco Road to Ashtray
- WAVE to Scape/Rolling in Cleavage (part of 3-way wave with Sunshine Coast — not visible)
- Ski to Eagle Creek · Sweep by skiing groomer and looking/calling into creek · Ski to base of GE
Old Chute/Wildfire Sweep
- Last chair on GE · Ski Sunshine Coast to Old Chute · Ski diagonal traverses, checking pockets each side
- At bottom of Old Chute: pull 'Slow' banner + orange deflector fence, place in trees on right
- Ski Sunshine Coast to Wildfire perm sign
- WAVE to Sunshine Coast sweep · Ensure racing closure ropeline is open (closure may remain on left from perm sign down)
- Ski diagonal traverses across Wildfire, calling into trees on either side
- Pull green 'Merge' banner at bottom, place in trees on left
- Ski Sunshine Coast to base of GE
Snuffy's Sweep
- At 3:30: close double ropeline closure gate, flip sign closed
- Ski diagonal traverses across Snuffy's · Ski out to bottom of Fatboy
✓ CompleteRadio Dispatch: "Snuffy's closed, swept and clear" · Ski to base of GE for last chair
Patrol Names Map — Upper Mountain
Annotated resort trail map showing patrol area names used in checks and sweeps communication.
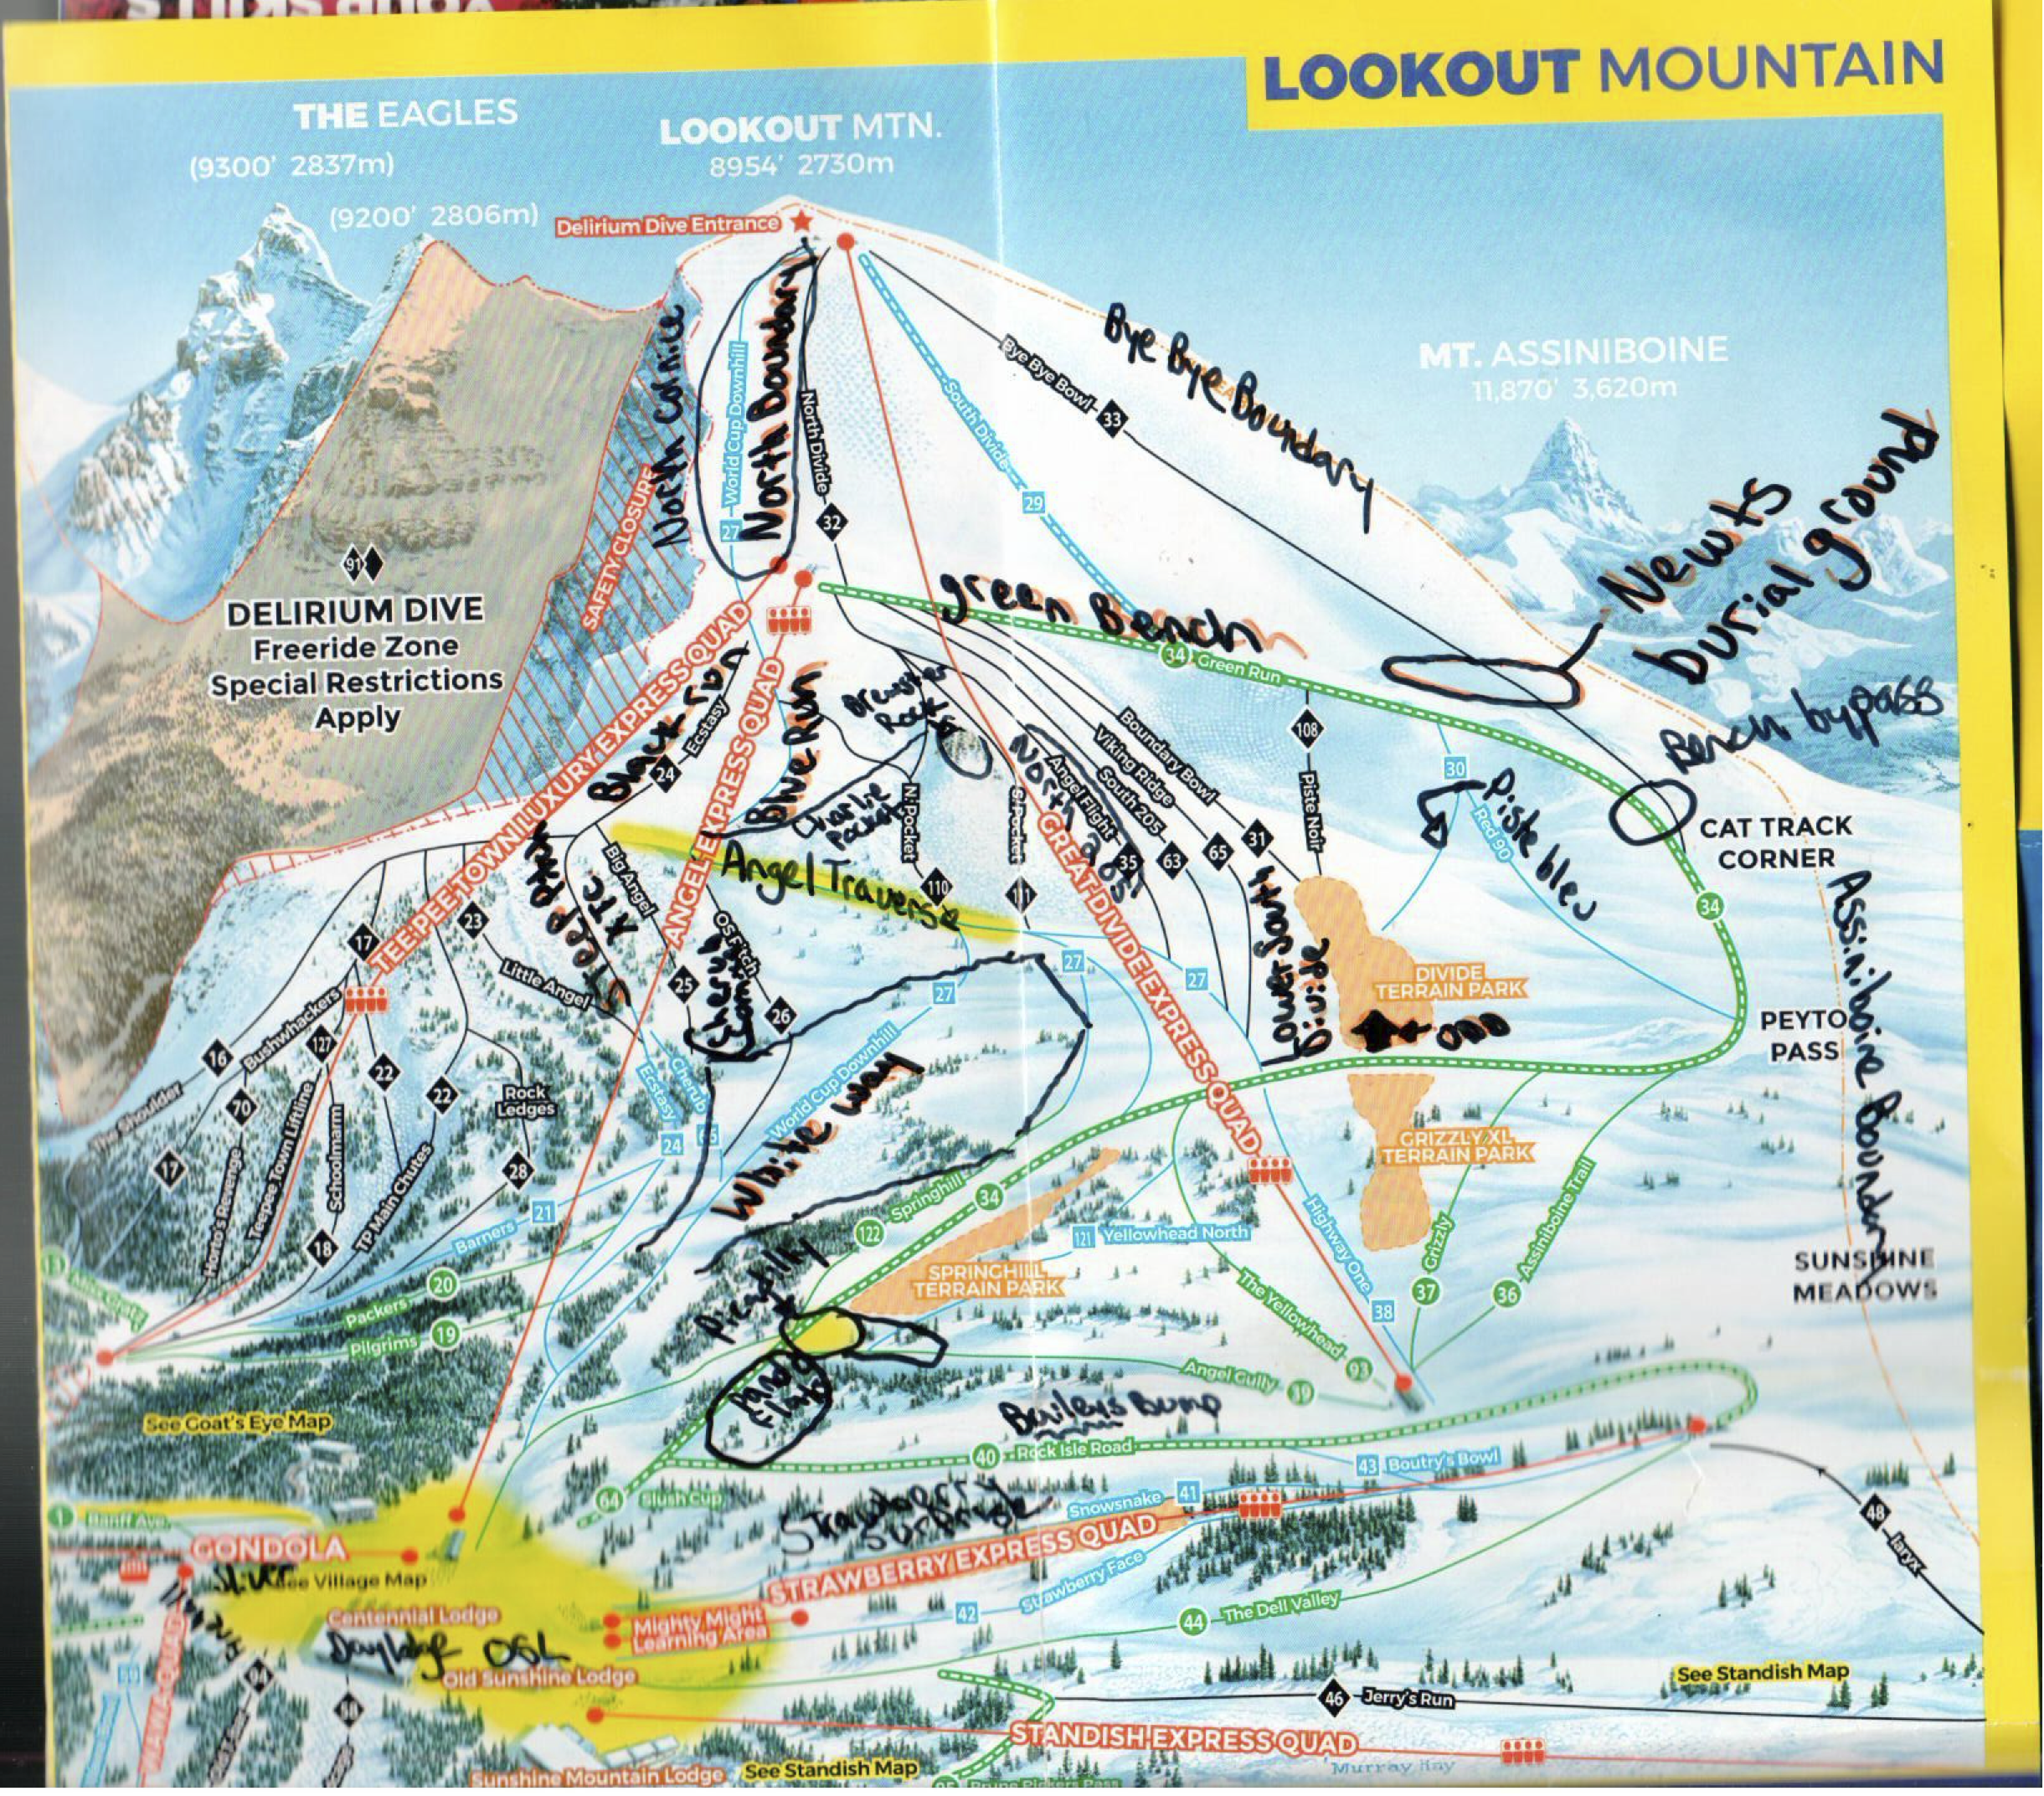
Click to open full screen
Lowers Sweep Routes
■ Lifty Sweep (dark blue) ·
■ Borderline Sweep (purple) ·
■ Wawa Ski Sweep (light blue)
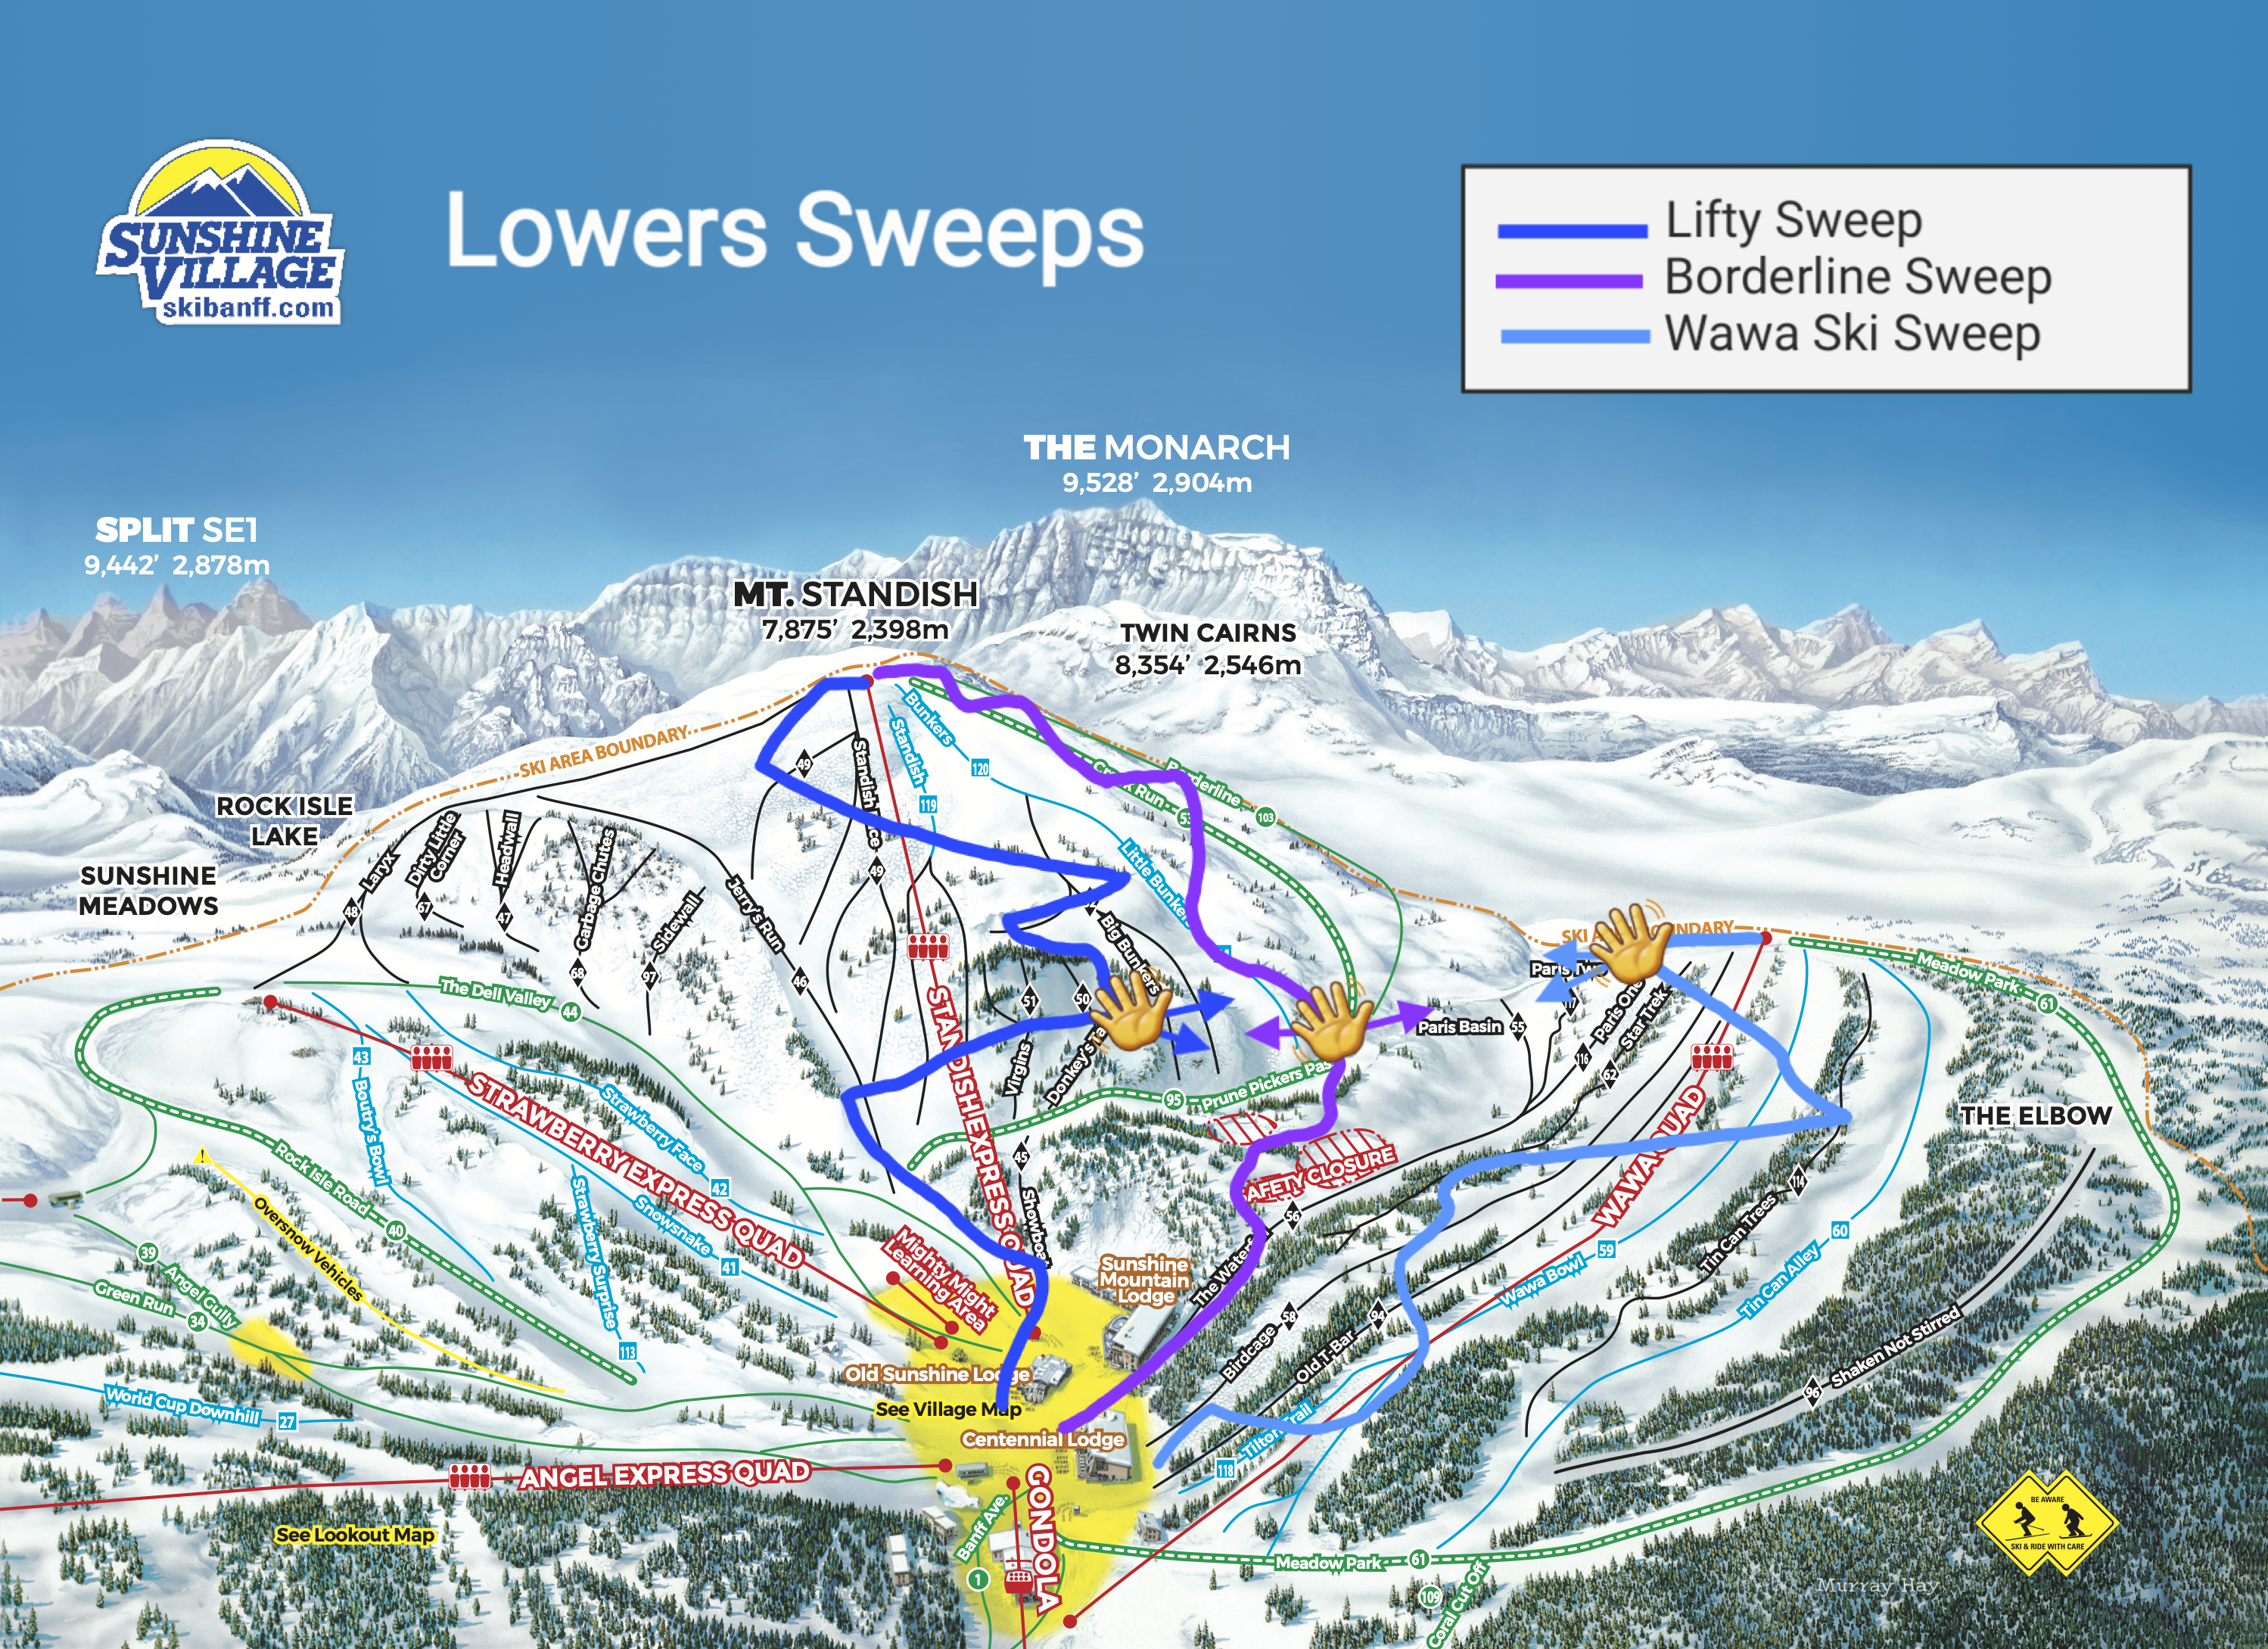
Click to open full screen
Uppers Sweep Routes
■ Assiniboine Sweep (blue-grey) ·
■ Divide/Angel Sweep (orange) ·
■ Rock Ledges Sweep (purple) ·
■ TP/Shoulder Sweep (green)
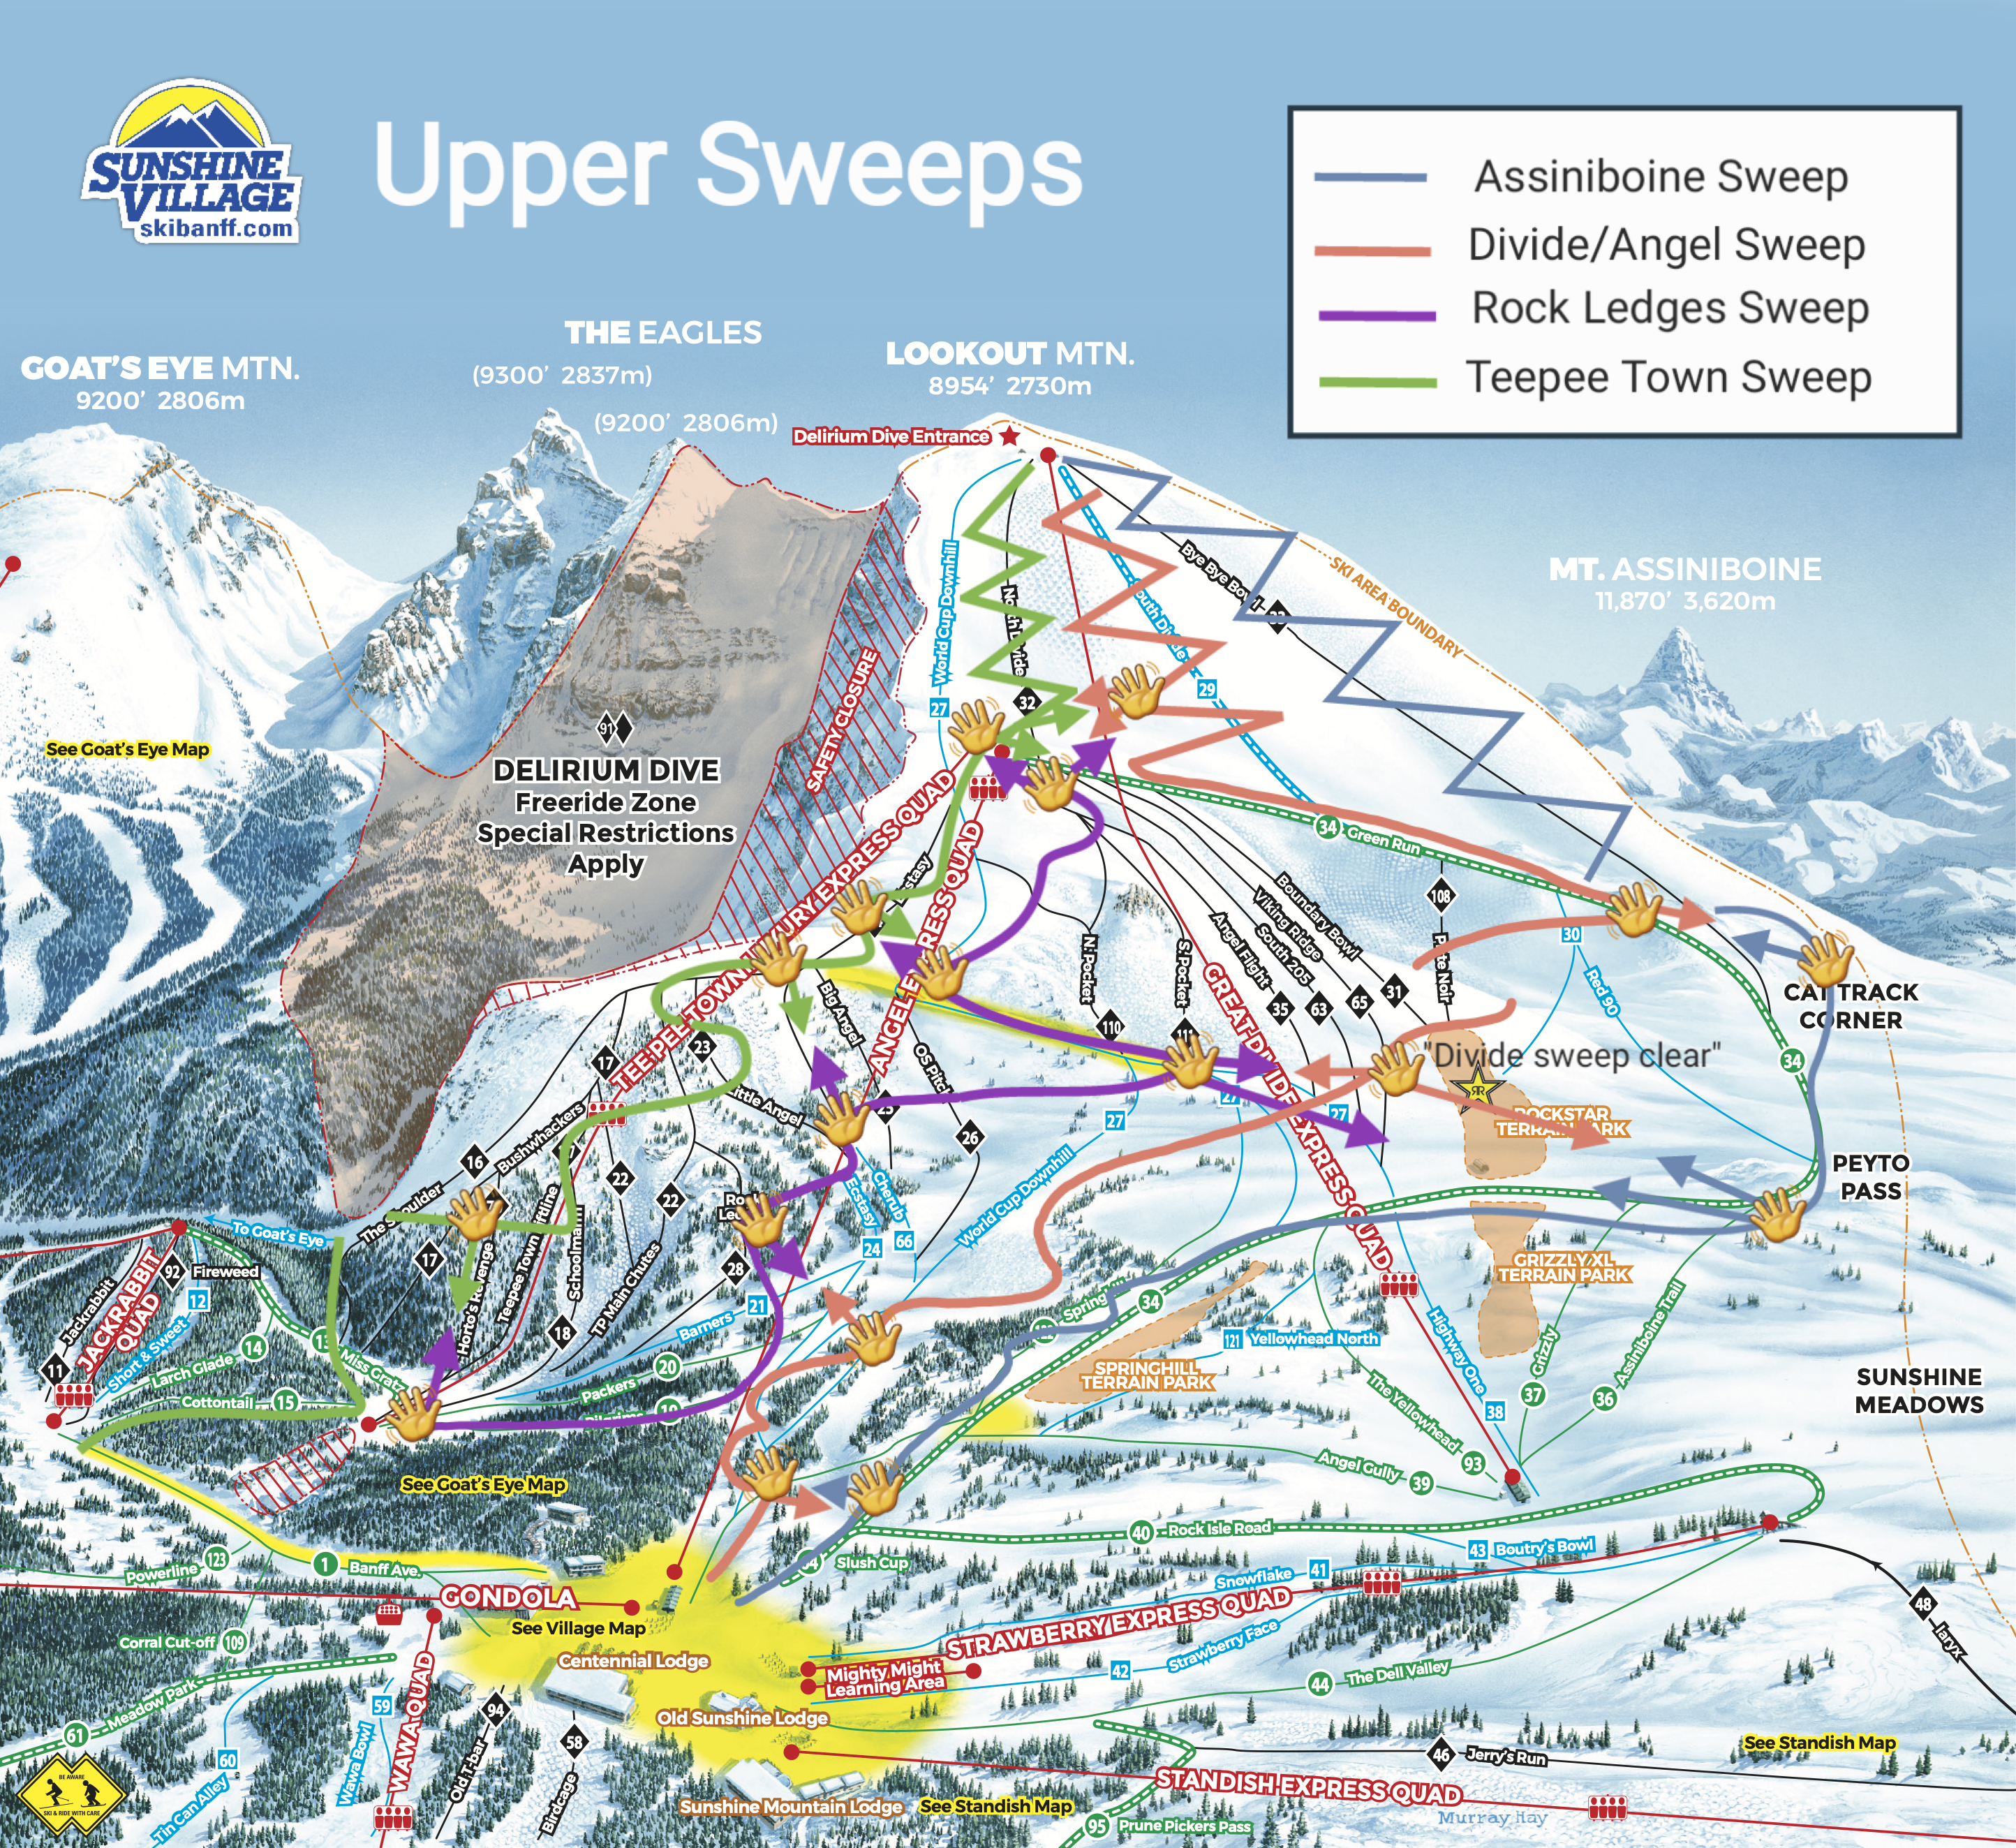
Click to open full screen
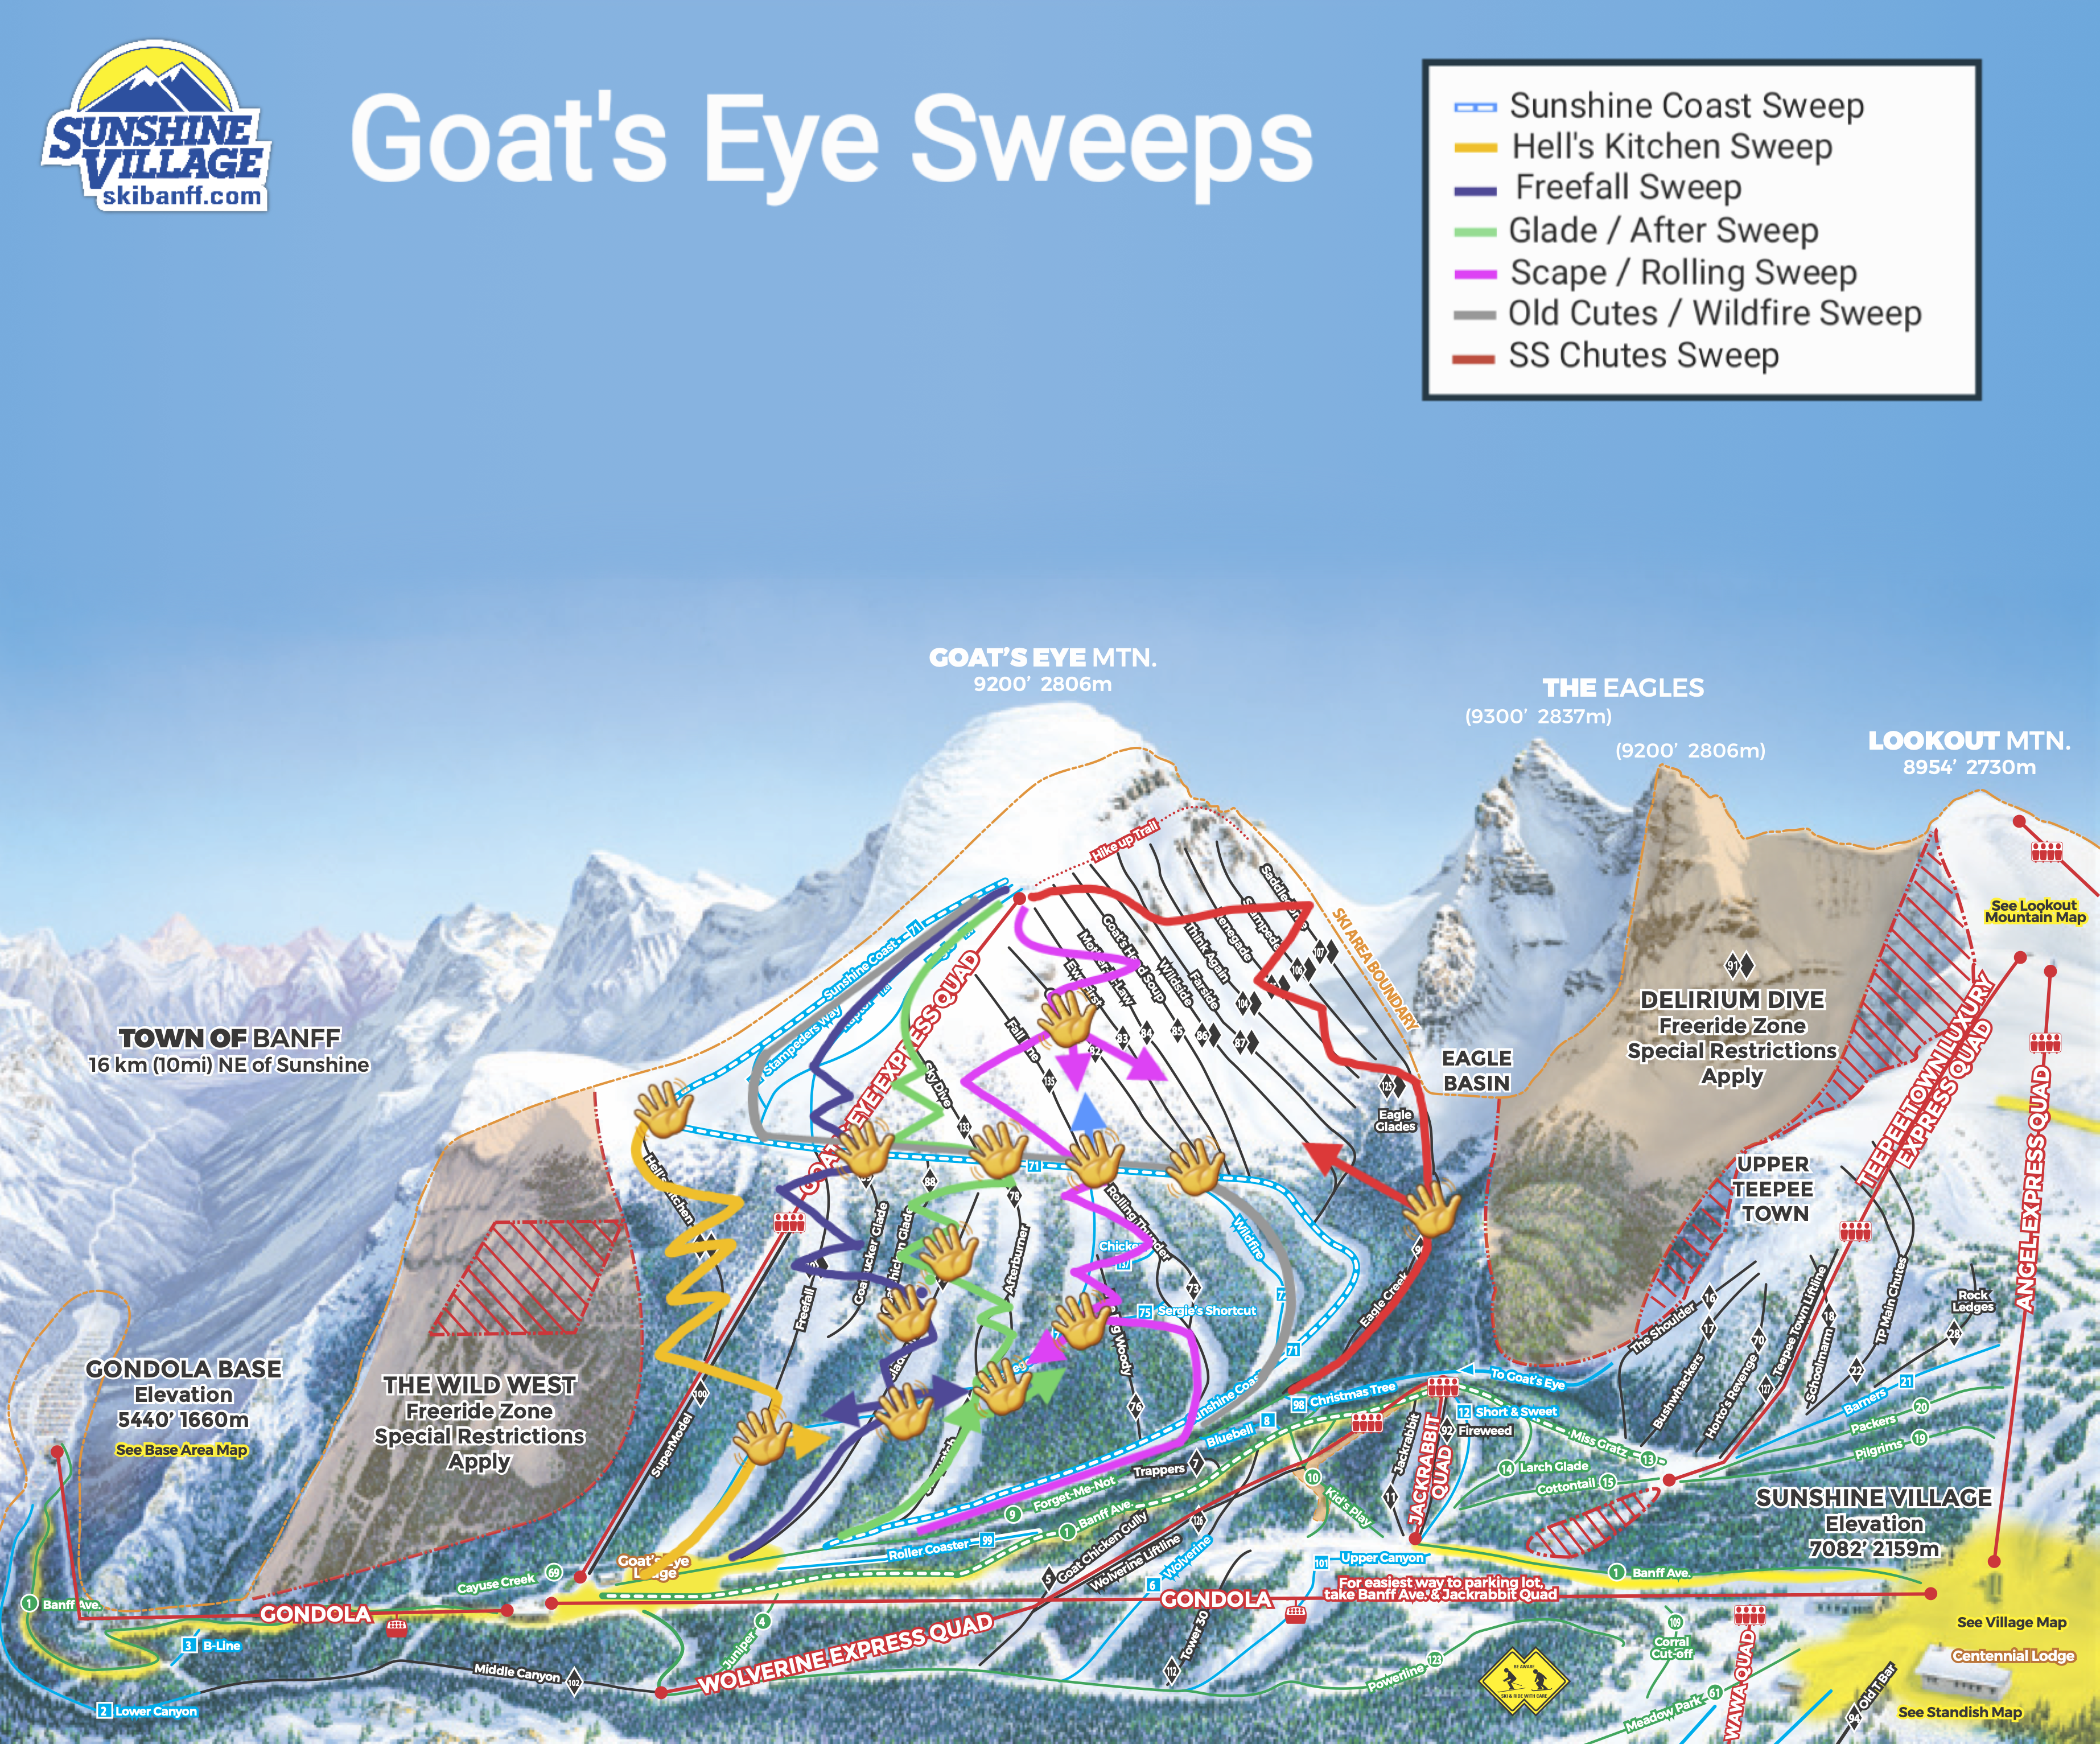
Goat's Eye Sweep Routes
Goat's Eye sweep map showing patrol route coverage. Note: GE sweep leader calls Dispatch once for all GE checks.
Click to open full screen
Radio Basics
ℹ Always on Ch 1
Keep radio on Channel 1 (Ops Repeater) at all times. Ch 3 is backup. Keep transmissions short and use codes. Dispatch operates 0800–1730 from PHQ.
| Channel | Name | Type | Use |
|---|
| 1 | OPS RPTR | Repeater | Patrol primary — on at all times |
| 2 | GON RPTR | Repeater | Gondola |
| 3 | MNT RPTR | Repeater | Maintenance / Ch 1 backup |
| 4 | EVNT RPTR | Repeater | Events / Bourgeau |
| 5–8 | Direct channels | Simplex | Correspond to CH 1–4 without repeater |
| 9–12 | — | — | Blank |
| 13 | ALP SMPX | Simplex | Alpine Helicopters |
| 14 | SCH SMPX | Simplex | Ski School |
| 15–16 | SKI CLB 1–2 | Simplex | Ski Club (coaches) |
Known Radio Dead Spots
Repeaters are at Wawa Ridge, Brewster Rock, and Curve Station. Known dead spots: parts of Delirium Dive, Bye Bye Bowl, Wild West, and the Bourgeau base area. Some metal buildings also degrade signal.
Radio Technique
- Hold mic 2 inches from mouth at 45° angle — shield from wind
- Speak calmly and clearly. Confirm recipient is ready before transmitting info.
- Radio check response format: "[loudness 1–5] by [clarity 1–5]" e.g. "5 by 5, loud and clear"
- Profanity is illegal over radio (federal law)
- Never pick up radio by antenna or collar mic
Dispatch Tone Beeps
| Beeps | Meaning |
|---|
| 1 long beep | 6-Alpha — Avalanche |
| 2 medium beeps | Code 5 — Fire |
| 3 short beeps | Code 6 — Medical/First Aid |
| 1 short beep + "6-23 attention all radios" | Code 4 (Gondola evacuation) or Code 7 (Lift evacuation) |
6-Codes & 10-Codes
6-Codes (Equipment & Incident)
| Code | Meaning | Code | Meaning |
|---|
| Code 6 | Medical/First Aid | 6-21 | Trauma Pack |
| 6-0 | Inebriated Person | 6-22 | Helicopter |
| 6-16 | Snowmobile (ski-doo) | 6-23 | Ambulance |
| 6-17 | Toboggan | 6-24 | Thomas Splint (incl. 6-19) |
| 6-18 | Assistance (state # required) | 6-25 | Investigation Pack |
| 6-19 | Backboard | 6-30 | Medical Volunteer (Medic) |
| 6-20 | Doctor's Pack | 6-A | Avalanche |
| | 6-B | Severe Bleeding |
| | 6-C | Cardiac |
| | 6-D | Dislocation |
| | 6-H | Head Injury |
10-Codes (SSV specific)
| Code | Meaning | Code | Meaning |
|---|
| 10-4 | Understood | 10-33 | Security Emergency |
| 10-7 | Unavailable | 10-36 | Time Check |
| 10-8 | Available | 10-40 | On Scene |
| 10-9 | Say Again | 10-41 | Arrival at Village or Goat's Eye Infirmary |
| 10-12 | Unauthorized Listener | 10-42 | Arrival at Bourgeau |
| 10-20 | Location Query | 10-50 | Radio Silence |
| 10-21 | Call by Phone | 10-70 | Status Check |
| 10-23 | All-Points Bulletin | | |
Priority Classification
| Class | Meaning |
|---|
| Class 1 | Non-urgent / Low priority |
| Class 2 | Important / Medium priority |
| Class 3 | Urgent / High priority |
ℹ When In Doubt
Use plain English over the radio if you're unsure of a code. These codes are SSV-specific and should not be used when operating with other agencies.
Code 6 Response Flow
Step 1 — Dispatch Calls the C6
Dispatch: "BEEP–BEEP–BEEP, Code 6 [location], [description]"
→ Non-essential radio traffic stops immediately.
Step 2 — Patrollers Declare Position
All nearby patrollers state name + location (closest goes first):
Patroller A: "Alex — top of Standish"
Patroller B: "Sam — top of Wawa"
Step 3 — Responder & Backer Confirm
Responder: "Dispatch from Alex, Dispatch"
Dispatch: "Go ahead Alex"
Responder: "I will respond from the top of Standish"
Dispatch: "10-4"
─────
Backer: "Dispatch from Sam, Dispatch"
Dispatch: "Go ahead Sam"
Backer: "I will [load Wawa / back from top of Wawa]"
→ Backer must have 6-17, 6-19, and 6-21 at their backing location.
Step 4 — On Scene
Responder: "Dispatch from Alex, Dispatch"
Dispatch: "Go ahead Alex"
Responder: "I am 10-40 at [exact location — use landmarks and tower numbers]"
Step 5 — After Primary Survey
Responder: "Dispatch from Alex, Dispatch"
Dispatch: "Go ahead Alex"
Responder: "I have a condition [Green / Yellow / Red], [nature of injury], requesting [codes]"
Dispatch: "10-4 Copy [Backer]"
Backer: "[Name] copies [equipment] from [location]"
⚠ First On Scene = Lead Patroller
The first patroller on scene owns the C6 from arrival to completion — including all paperwork. Lead role can be transferred to a Senior Patroller (communicate to Dispatch).
Step 6 — Critical Interventions
Radio Dispatch whenever specialized equipment arrives on scene or a critical intervention is performed (e.g., O2, splinting, medication). This ensures the dispatch log is accurate for EMS handoff.
Step 7 — Transport
When ready to move patient:
Responder: "Dispatch from Alex, Dispatch"
Dispatch: "Go ahead Alex"
Responder: "Myself and [names] are transporting [equipment] from [location] to [destination]"
Step 8 — Gondola / Ambulance Warning (if needed)
20-minute warning when loading gondola:
Responder: "I am online [cabin colour and number] — this is your 20-minute warning"
Dispatch: "10-4" → Dispatch phones EMS
Step 9 — Arrival & Handoff
On arrival at infirmary:
Responder: "10-41 [Village infirmary / Goat's Eye infirmary] from [origin]"
On arrival at Bourgeau for EMS handoff:
Responder: "10-42 [origin]"
EMS Stats for 6-23 (Ambulance)
Give Dispatch advance notice — say "I have stats for 6-23 when ready" and wait for go-ahead.
| Item | Include |
|---|
| Age & sex | e.g., "55-year-old male" |
| Chief complaint | Nature and location of injury |
| Other injuries | Any secondary findings |
| LOC / A/Ox | Alert & oriented to: Person, Place, Time, Event (1–4) |
| Allergies | Medications allergic to |
| Medications | Current medications |
| Deficits | Neuro/vascular deficits distal to injury |
| Pertinent history | Relevant medical history |
| Interventions | Drugs administered, O2, splinting |
| Helmet | Was patient wearing a helmet? |
ℹ Helicopter (6-22)
Give as much notice as possible — minimum 45 minutes lead time required.
Patient Condition Codes
| Condition | Meaning | Actions |
|---|
| GREEN |
Not life threatening |
Standard assessment and transport. Backer may not need to come to scene. |
| YELLOW |
Possibly life/limb threatening |
Backer comes to scene. Monitor continuously. Lead patroller responsible until EMS handoff. |
| RED |
Life threatening |
All available resources respond. Lead patroller remains hands-off to maintain situational awareness. Consider ICS structure. |
ℹ Medical Volunteers (6-30)
SSV medical volunteers provide higher-level care but do not assume control of the scene. Lead patroller coordinates with the volunteer. Only verified volunteers are used — unverified bystanders do not take clinical control.
Vital Signs Reference
| Parameter | Adult (normal) | Children 6–12 (normal) | Assess |
|---|
| Respirations | 12–20 / min | 18–30 / min | Rate, Rhythm, Quality. Normal/Shallow/Laboured/Noisy. If SpO₂ <94% consider O₂. |
| Pulse | 60–100 bpm
"Canmore fit": 35–60 | 70–120 bpm | Rate, Rhythm, Quality. Regular/Irregular, Strong/Weak. |
| Blood Pressure | Systolic 95–120
Diastolic 60–80 | Systolic 80
Diastolic 60–80 (±20) | Systolic / Diastolic |
| Blood Glucose | 4–8 mmol/L | 4–8 mmol/L | "4–8 is great!" Consider hypoglycaemia if altered LOC. |
| Pupils | PEARL: Equal & Reactive to Light | Compare bilaterally |
| Skin | Normal colour, warm, dry | Colour, Condition, Temperature |
| LOC / A/Ox | Fully Alert / Verbal / Pain / Unresponsive | Person=1, Place=2, Time=3, Event=4 |
Primary Survey (Adapted for SSV)
Conduct a primary survey on arrival at any Code 6. Use your CSP-trained ABCDE approach, adapted to SSV context.
| Step | Action | SSV Notes |
|---|
| Scene Safety | Ensure scene is safe before approaching | Consider avalanche hazard, further fall risk, exposure |
| MOI | Determine mechanism of injury | High-speed impact, fall, collision — affects packaging decisions |
| Airway | Open and maintain airway | C-spine precautions if MOI warrants |
| Breathing | Rate, rhythm, quality | Altitude and cold affect respiratory assessment |
| Circulation | Pulse, major bleeding | Gloves on — control severe bleeding (6-B) immediately |
| Disability | LOC, pupils, neuro | A/Ox 1–4, pupils, distal neurovascular check |
| Expose/Environment | Expose injury, protect from cold | Minimize exposure time — hypothermia risk significant at SSV |
Code 6 Communications Cheat Sheet
| Call | Script / Content |
|---|
| On Scene | "10-40 @ [descriptive location]" |
| Condition Call | "Condition [Green / Yellow / Red], [injury type], requesting [codes]" |
| Equipment Request | List all 6-codes needed |
| Transporting | "[Names] transporting [equipment] from [location] to [destination via method]" |
| Gondola boarding | "Online [cabin colour + number] — 20-minute warning" |
| Arrival at infirmary | "10-41 [Village/GE] + starting location" |
| Arrival at Bourgeau | "10-42 [starting location]" |
| If SEND activated | Notify Dispatch immediately — provide location |
Transport & Patient Handoff
- Provide Dispatch: departure location, destination, patroller names, method of transport, 6-16 meeting point if needed
- Yellow and Red patients: lead patroller monitors until EMS handoff or transfer to Hut patroller
- Green patients: may be handed off to Hut patroller with full verbal report
- Verbal handoff must include: mechanism, findings, interventions, vitals trend, allergies, medications
- All patrollers at scene complete patroller comments — note time of transfer
CSP SSV Organization
| Position | Name | Phone | Email |
|---|
| Patrol Leader (PL) | Mark Nodwell | 403-991-4994 | nodwell@gmail.com |
| APL Training | Jeromy Lonnen | 403-333-6035 | jer.bear@shaw.ca |
| APL At Large | Robert Walker | 403-874-1779 | robert.walker4@gmail.com |
| APL Education | Michelle Zieber | 403-801-8264 | zieber@telusplanet.net |
Your Responsibilities
- Patrol minimum 3 weekend days/month (21 days/season) for commitment subsidy
- Complete annual CSP Zone Re-certification (16 hours)
- Attend annual SSV Returning Weekend (2 days)
- Skiing and toboggan skills evaluated at least every 3 years
- Keep patrol jacket and pack in good condition — report damage to APL Equipment
Rostering
| Item | Details |
|---|
| Roster site | sunshine.csproster.ca |
| Roster by | At least 1 week before shift |
| Report time | 0800 at PHQ |
| Running late | Call Dispatch: 403-762-6515 (emergency) or text PL |
| Cancel >24h out | Email wait list + email PL/APL Roster |
| Cancel <24h | Call PL/HL + email SSV Dispatch night before + call morning of |

